

データバインディング
WPFではデータバインディング (Data Binding) をサポートしています。
データバインディングでは、二つのオブジェクトを結びつけることが可能になります。
具体的にどういうことかつかむために、例えばあるドロップダウンリストで選択された項目と関連付けてラベルを変化させるという場合を考えてみましょう。
この場合、ドロップダウンリストの選択項目の変化イベントにて、ラベルを書き換えるというコードを書くことももちろんできます。 従来多くの場合でこうしたコードを書いたことがあると思います。
データバインディング流では「このドロップダウンの選択項目とこのラベルを同期させる」という意味を書きます。
実際のコードでこれをみてみましょう。
WPF のデータバインディングの簡単なサンプル
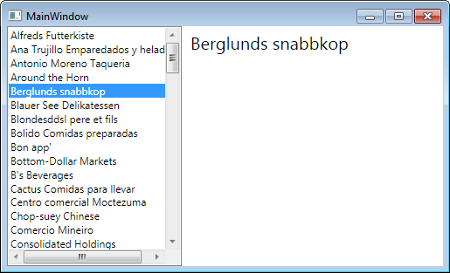
次のように画面の左側にリストボックス (ListBox)、右側上部にテキストブロック (TextBlock) があるプログラムを考えます。
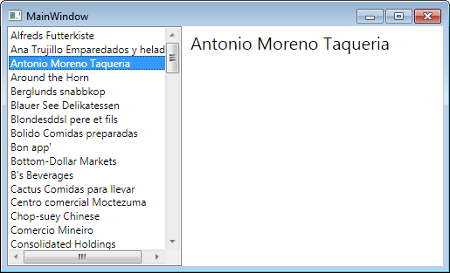
リストボックスの選択項目を変化させると、テキストブロックの内容も変わっています。
これをデータバインディングを使うとどのように書けるかみてみましょう。
まずコントロールのレイアウトを行う XAML は次のように書きました。それぞれのコントロールの名前を設定しています。
<Window
  x:Class="DataBindTest1.MainWindow"
  xmlns="http://schemas.microsoft.com/winfx/2006/xaml/presentation"
  xmlns:x="http://schemas.microsoft.com/winfx/2006/xaml"
  Title="MainWindow">
  <WrapPanel>
    <ListBox Name="listBox1" Width="200"/>
    <TextBlock Name="textBlock1" FontSize="20" Margin="10,5,0,5"/>
  </WrapPanel>
</Window>
コードは次のとおりです。
using System.Linq;
using System.Windows;
using System.Windows.Controls;
using System.Windows.Data;

namespace DataBindTest1
{
  public partial class MainWindow : Window
  {
    public MainWindow()
    {
      InitializeComponent();

      // ListBox - Customers.CompanyName
      using (var ctx = new NorthwindEntities())
      {
        var customers = from c in ctx.Customers
            select c.CompanyName;
        listBox1.ItemsSource = customers.ToList();
      }

      // Bind to Selected Item
      Binding binding = new Binding();
      binding.Source = listBox1;
      binding.Path = new PropertyPath("SelectedItem");
      textBlock1.SetBinding(TextBlock.TextProperty, binding);
    }
  }
}
ここでは MS のサンプルによく出てくる Northwind データベースを使っています。まずリストボックスの ItemsSource に LINQ でとってきたデータをリストとして設定しています。
今回はテキストブロックに着目して、リストボックスにテキストブロックをどのように同期させるのか、どのようにデータバインディングするのか着目します。
それは次の部分です。
      // Bind to Selected Item
      Binding binding = new Binding();
      binding.Source = listBox1;
      binding.Path = new PropertyPath("SelectedItem");
      textBlock1.SetBinding(TextBlock.TextProperty, binding);
バインディングするソース (Source) とパス (Path) を設定しています。
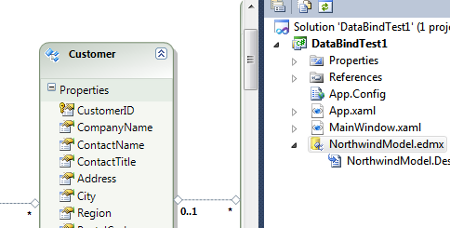
ちなみにここではデータは ADO.NET Entity Data Model を利用しました。
XAML によるバインディングの設定
上ではコードでバインディングの設定を行いましたが、XAML だけでバインディングを行うことも可能です。
上記のコードと同じ意味の XAML は次のようになります。
<Window x:Class="DataBindTest1.MainWindow"
        xmlns="http://schemas.microsoft.com/winfx/2006/xaml/presentation"
        xmlns:x="http://schemas.microsoft.com/winfx/2006/xaml"
        Title="MainWindow">
  <WrapPanel>
    <ListBox Name="listBox1" Width="200"/>
    <TextBlock
      Name="textBlock1"
      Text="{Binding ElementName=listBox1, Path=SelectedItem}"
      FontSize="20" Margin="10,5,0,5"/>
  </WrapPanel>
</Window>
ちなみに XAML で TargetNullValue という属性を設定してソースに何も選択されていない場合の値を指定することも可能です。
<Window x:Class="DataBindTest1.MainWindow"
        xmlns="http://schemas.microsoft.com/winfx/2006/xaml/presentation"
        xmlns:x="http://schemas.microsoft.com/winfx/2006/xaml"
        Title="MainWindow">
  <WrapPanel>
    <ListBox Name="listBox1" Width="200"/>
    <TextBlock
      Name="textBlock1"
      Text="{Binding ElementName=listBox1, Path=SelectedItem, TargetNullValue=(n/a)}"
      FontSize="20" Margin="10,5,0,5"/>
  </WrapPanel>
</Window>