

MSBuild による WPF プログラムのビルド - イベントの追加
前回までで MSBuild によって WPF プログラムをビルドする方法を学びました。ここでは XAML でボタンを追加して、 そしてさらにイベントハンドラをセットします。
この方法によって、XAML を XamlReader で自分で呼び出して、FindName してハンドラをセット・・・という方法と比べて、 ずっと簡単にプログラム開発可能であることがわかります。
XAML によるボタンとハンドラの定義
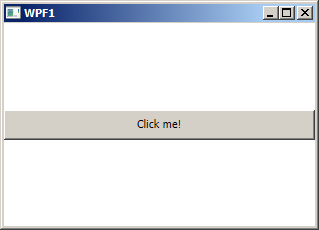
MainWindow.xaml を次のように定義します。ここでは Grid の中にひとつボタンを配置しています。
<Window x:Class="TestApp.MainWindow"
	xmlns="http://schemas.microsoft.com/winfx/2006/xaml/presentation"
	xmlns:x="http://schemas.microsoft.com/winfx/2006/xaml"
	Title="WPF1" Height="300" Width="300">
	<Grid>
		<Button
			Name="button1"
			Click="button1_Click"
			Height="30"
			Content="Click me!"/>
	</Grid>
</Window>
Click="button1_Click" としてイベントハンドラを設定しています。この button1_Click はどこにあるのでしょうか。それはこのコードファイルにあります。
MainWindow.xaml.cs で button1_Click を定義しています。
using System;
using System.Windows;
namespace TestApp
{
public partial class MainWindow : Window
{
public MainWindow()
{
InitializeComponent();
}
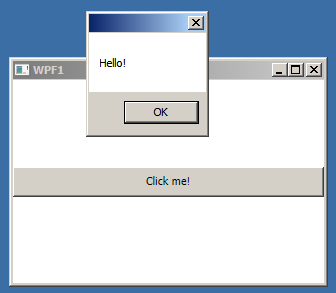
public void button1_Click(object sender, RoutedEventArgs e)
{
MessageBox.Show("Hello!");
}
}
}
XAML でメソッド名を指定、コードでメソッドを定義。これだけでイベントハンドラが設定されます。
App.xaml は次のとおり。以前と変わりありません。
<Application
	x:Class="TestApp.App"
	xmlns="http://schemas.microsoft.com/winfx/2006/xaml/presentation"
	xmlns:x="http://schemas.microsoft.com/winfx/2006/xaml"
	StartupUri="MainWindow.xaml">
</Application>
念のためコードファイル App.xaml.cs を示すと次のとおり。
using System;
using System.Windows;

namespace TestApp
{
	public partial class App : Application
	{
	}
}
特に何もやっていません。
ビルドスクリプトにも特に変更はありません。
<?xml version="1.0" encoding="UTF-8"?>
<Project
	ToolsVersion="4.0"
	xmlns="http://schemas.microsoft.com/developer/msbuild/2003"
	DefaultTargets="Build">
	<PropertyGroup>
		<OutputType>WinExe</OutputType>
		<RootNamespace>TestApp</RootNamespace>
		<AssemblyName>hello</AssemblyName>
		<TargetFrameworkVersion>v4.0</TargetFrameworkVersion>
		<TargetFrameworkProfile>Client</TargetFrameworkProfile>
		<AppDesignerFolder>Properties</AppDesignerFolder>
		<OutputPath>bin\</OutputPath>
		<DebugSymbols>True</DebugSymbols>
		<DebugType>Full</DebugType>
		<Optimize>False</Optimize>
		<CheckForOverflowUnderflow>True</CheckForOverflowUnderflow>
		<DefineConstants>DEBUG;TRACE</DefineConstants>
	</PropertyGroup>
	<ItemGroup>
		<Reference Include="PresentationCore">
			<RequiredTargetFramework>3.0</RequiredTargetFramework>
		</Reference>
		<Reference Include="PresentationFramework">
			<RequiredTargetFramework>3.0</RequiredTargetFramework>
		</Reference>
		<Reference Include="System" />
		<Reference Include="System.Core">
			<RequiredTargetFramework>3.5</RequiredTargetFramework>
		</Reference>
		<Reference Include="System.Xaml">
			<RequiredTargetFramework>4.0</RequiredTargetFramework>
		</Reference>
		<Reference Include="System.Xml" />
		<Reference Include="WindowsBase">
			<RequiredTargetFramework>3.0</RequiredTargetFramework>
		</Reference>
	</ItemGroup>
	<ItemGroup>
		<ApplicationDefinition Include="App.xaml" />
	</ItemGroup>
	<ItemGroup>
		<Compile Include="App.xaml.cs">
			<SubType>Code</SubType>
			<DependentUpon>App.xaml</DependentUpon>
		</Compile>
		<Compile Include="MainWindow.xaml.cs">
			<SubType>Code</SubType>
			<DependentUpon>MainWindow.xaml</DependentUpon>
		</Compile>
	</ItemGroup>
	<ItemGroup>
    	<Page Include="MainWindow.xaml" />
	</ItemGroup>
	<Import Project="$(MSBuildBinPath)\Microsoft.CSharp.Targets" />
</Project>
msbuild でビルドして、実行すると次のとおり実行されました。
ボタンを押すと確かにポップアップメッセージが表示されました。
ここまで素で試したら、あとは Visual Studio の WPF プロジェクトが見えてきますね。Visual Studio はハンドラ自体の生成、グラフィカルなデザイナ等によって開発をサポートしますが、 余計な見えないソースコードは(少なくともこの程度の内容では)何も生成しないことがわかるはずです。